Once you have modified you Honda Ruckus to the point where you needed to remove the stock speedometer, or have just decided you don’t like it, lets look at some replacements. There are a lot of good options out there that range in price size and function, though I will only be mentioning a few.
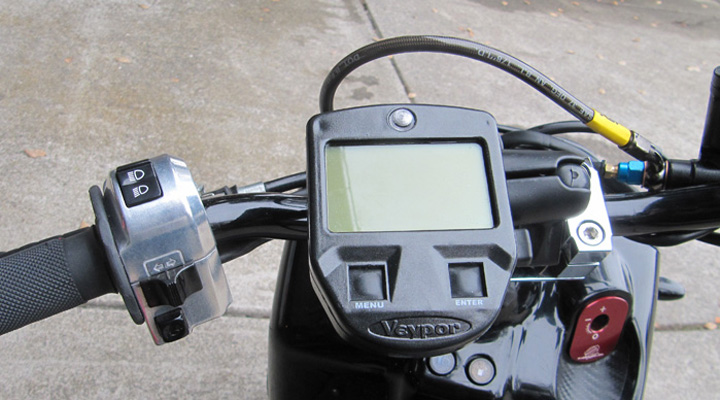
In my situation as many, I removed my stock front forks and drum brake setup and up graded to an NCY front end. Now, the stock NCY front end kit will in-fact still allow you to use the stock speedometer as it it provides you with a new speedo gear and cable. For me, I had a daytona 5-star wheel and an ATR hub that needed to fit up there, and the stock speedo is a no go in this situation. The reason for this is because in order to center the wheel (with custom spacers) it would not physically allow a gear driven speedo. I did a lot of research and landed on the Veypor VR2. Installing a Veypor VR2 speedometer is actually quite a straight forward process.
Great Speedo Options:
Veypor VR2: $200.00
- RPM: Yes
- PC Download: Yes
- Date/Time: Yes
- Odometer: Yes
- Fuel level: NA
- Trip Computer: Yes
Koso Speedo Tachometer: $170.00
- RPM: Yes
- PC Download: No
- Date/Time: Yes
- Odometer: No
- Fuel Level: Yes (with addl parts)
- Trip Computer: Yes
Daytona Speedo Tachometer Combo:$190.00
- RPM: Yes
- PC Download: No
- Date/Time: Yes
- Odometer:No
- Fuel Level yes (with addl Parts)
- Trip Computer: Yes
I have not listed all the option here, these are the ones that where on the top of my list for consideration. In reality all these are great options, and for the most part they all have the same feature set, just comes down to your taste. I went with the Veypor because the screen is nice and big, the buttons are easy to hit with gloves, and it is full of options, more options than any of the others.
Installation is not all that tough, but can be a little daunting. The instructions actually very good, you just have to actually read them… ;). So lets go through the install.
First, find a place to mount it, I have a Kijima handlebar clamp, and I wanted it to fit snugly in the middle, after a little girding with the Dremmel, fits like a charm.

After that I ran the speedo sensor line down the front forks and mounted it to the back of my brake caliper mount. Now This can be done a number of ways, some prefer mounting it to the back tire, in my opinion its a waste of effort. However, if you do not have a disk brake setup, then going to the rear might be the easiest route, depends on your setup. When mounting the sensor be aware the BUMPY SIDE GOES TOWARDS THE MAGNET.

Next, mount the magnet to the wheel, or in my case I mounted it to the disk rotor. The magnet needs to be within .75″ of the sensor, this is very important. I roughed up the surface on both the rotor and the magnet and used some JB Weld, to secure it down!

Next we off to start wiring the thing up, for this I would remove the whole battery box. This part is actually very easy. I have a picture here illustration the wiring schematic to help. Pretty self explanatory except the RPM wire which we will cover next.

I put the control box in the battery cage, now I have a Ballistic Battery so I have a lot more room than you might if you still have the stock battery. So findig a good home for the unit might just need a little looking around.

So pretty easy right, lets tackle the RPM wire first (the white one) Tere are a lot of opinions out there about this, but I found the most reliable source for this. In your battery box you should have a lone blue/yellow striped wire. If you splice into that bad boy you will have the most solid RPM reading possible. I suggest soldering it on, but you can use the supplied crimps instead.
 Boom, done with the RPM wire, next we need power for our Veypor, for this we need a “switched” source. That is a source that only gets power when the key is in the ignition and turned on. So we are going to use the old power lines for the original speedo. Dig into the front out the batter box and find a cluster of wire connectors, there will be like orange, cyan,… a bunch of bright colors. Find the green and the black. These are the ones we are going to use. So the green is NEG and the black is POS. I soldered the green to the black and black to the red wire for the power source.

Give it a test turn your key and it should fire up indicating you did it right (make sure the harness from the control box to the unit is connected). That’s it for the install part next is calibrating the Veypor.

The RPM reading is basically dead on if you used the blue/yellow wire @ around 2000 RPM at idle. So setting up the speedo portion os rather easy. The hardest part is measuring the circumference of the wheel. What I did is mark may tire and mark the ground, then roll the bik until that mark came back around again and marked the ground one more time. Then measure between the two points. For me it was 47.5″ (this is smaller than stock as I have a 90/90-10 front tire).
Now that we have our measurement we need to go into the settings and change the measurement from Metric to Imperial. This does two things shown MPH instead of KPH, and changes the measurement system from mm to inches. Now go into configuration > weight/wheel/Launch. You will enter your weight, the launch sensitivity which I set to 0 or crazy things happen, and then enter the wheel circumference. BUT be aware you need to enter it in tenths. Thus for me 47.5 inches equates to 0475. Bam!, we are done, there are tons of other settings you can go nuts with, as well as setting time and date. Hope you like yours I love mine great purchase and great customer support!!!
Write a Reply or Comment