One of the best ergonomic changes you can make to your Honda Ruckus is add some foot-pegs or a forward footbar to your ride. Depending on how tall you are you might need some serious leg room to clear your handlebars. Now, the quick and affordable rout is throwing some rear pegs on your bike. Rear pegs will almost always suffice in the sense that they will give you more control, and put you in more of a “motorcycle” riding position. However, personally I am not a big fan of how it makes you look, (tends to look like somewhat like a monkey on a unicycle) and they can tire your knees out, as you are basically in a squatted stance. Don’t get me wrong, pegs are great I ran them for quite some time on one of my bikes, but I moved on for the reasons stated above. Now then, you have a few options you can consider, and it really comes down to your stylistic approach, and where you want your feet positioned. There are a bunch on different options out there for forward foot-bar controls. I have listed a few below. The thing with the foot-bars, is your knees still sit rather high, so if you are tall 6’2 and up you might be really crunched near the handlebars, as your elbows, knees and handlebars all land in the same area. This is where the MNNTHBX PegLegs footbar peg mounts come in.
Foot Bar Options
The following are the top foot bars in my opinion that are out there for the Ruckus. It really comes down to personal preference, height and style. Any of these options are killer:
Dorby Footbar: $200.00
RPRO Monster Kickers: $235.00
RuckHouse Foot Bar: $189.00
MNNTHBX PegLegs: $65.00
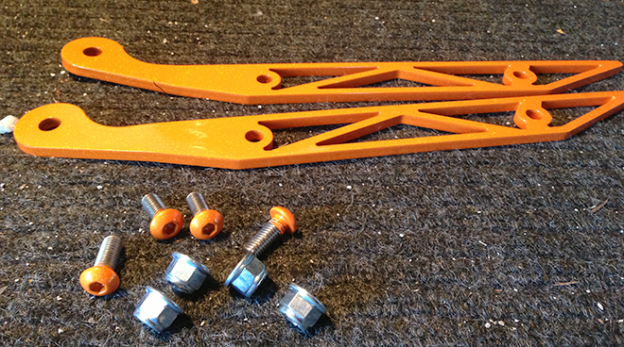
They allow your feet to extend past the floor board, and place your feet a good 4-6 inches lower than a foot-bar. The ergonomics are much better. The one drawback to these is that you have to drill two holes in your frame to mount them. Now I’m sure a lot of people hear that and immediately dismiss this product, AS I DID. Well, I decided to give them a chance, and let me tell you I am glad I did. I love them. I am 6’1″ and the position these mounts puts me in is perfect. The install process is very easy so lets briefly walk through it. This is what you get with the basic kit, if you are running a stock floorboard you will want the peg spacers as well. Basically uou get the mounts and four bolts to mount them to your frame. You can see mine are custom powder coated. You can order them either raw (which is what I did) or powder coated “eco black.”

First thing is use the mount as a template to drill your holes. be aware you need to ensure you have at least 1″ of space between the front wheel and the foot mount. Now I didn’t extend mine very far, this was a personal preference, I could have moved the mount probably another inch farther forward for more leg extension.

Next grab your drill, bite your upper lip and drill through your frame. The instructions specify the proper drill bit size.

The hole drilled out

After drilling your holes bolt up the mount with the provided hardware. Look close at the mounts as they are side specific.

You’ll notice my mount is about .5″ from the top, of the frame lip. This was not intentional (luckily it worked out ok), just besure when you start drilling you drill straight, the frame is angled slightly and my drill walked a bit causing this. no biggie thank god

Now that you got them all mounted up just need some standard pegs to bolt on and you are off. I have listed some peg options here, I went with the Killer Scooter pegs, they look sick, and bolt up flush with the corner radius of this mount.

Write a Reply or Comment